Supplies:
4" square tumbled marble tile
I found mine at Home Depot.
Craft Acrylic Paints
Picture hanger (for the back)
Crazy Glue, or strong epoxy
Inspiration design or template
Directions:
This is a quick project. Depending on the design chosen, it could be suitable for mid elementary grades and up.
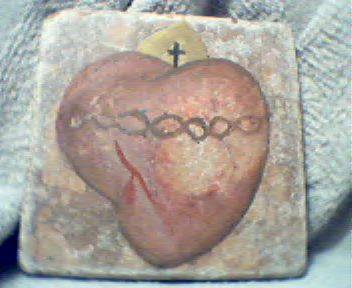
Take your tile and trace or lightly draw your design onto the front. I chose the Sacred Heart for this Boy's group
project last year. Simple is better I think, as you want to end up with an old look.
Once drawn, work with the colors you have chosen and paint the image. A good technique is a stippling motion -
more of a blopping movement, than a stroking movement. Don't fill the image in entirely, as you are going for a weatherd
look. While paint is still damp, take a clean old cloth (like a diaper) and gently blot off some of the paint, being
careful not to smear the colors. You can always add more paint if you would like.
Once you have a finished painting, let it dry. You can spary a matte sealer over the tile (non glossy - the invisible
type) as the paint can be wiped off with a damp sponge and little effort. If the tile will be on a wall (as opposed
to using it as a paper weight), then I don't think you have to spray.
When all the painting and spraying is done, then flip the tile over, and glue the hanger onto the back.
Voila! You are done!
Portable Kneeler
Supplies:
A 1" x 12" board, in desired length.
Thick piece of foam (3" or 4"), cut to the size of board
A sturdy piece of fabric (Drapery weight is good, if it is a tight weave, and natural fibers.
Staple gun (a power one is really best) or
Hammer and short nails with large heads.
Directions:
This is also a quick project. Once you have your board and foam cut to length (18" is a good "single" size), you
can then cut your fabric large enough to cover the top, sides and onto the bottom by about 2".
When fabric is cut, lay it face down on the floor. Center the foam on the fabric, and then lay the board on top
of the foam. You could use a spray adhesive if you would like, but it really isn't necessary.
Once all is stacked up, start in the center of one of the long sides, and gently but firmly pull the fabric around to
the back. Be careful not to let the fabric shift and become misalligned. When you have the raw edge to the back
of the board, carefully staple or nail it to the wood. Now do the same process to the opposite sides center. Then
work out from the center to the corners. At the corners, gently gather the fabric, little by littl, and staple to the
back as you go. Do this until you have all the fabric stapled down.
How tight you pull the fabric to the back, will determin how rounded the corners of foam are.
You are now done!
Photo Memory Pillow
(photo to be added soon)
Supplies:
Fine grained muslin (or any 100% natural fiber fabric)
Freezer paper (with the foild and plastic wraps at grocery store)
a Non-laser printer
scissors
iron
scraps of fabrics
embroider floss
charms, buttons, beads, etc.
Optional: Bubble Jet Set (this will make the printed image washable)
Directions:
This is a simple project. It is just a neat one because you can add photos or clip art, or whatever because you
use your printer to "make" the design on your "feature" piece of fabric.
Cut a piece of freezer paper to fit your printer and the picture you will print. Iron it, shiny wax side down onto
the back of your fabric. Iron it well, moving slowly, as you want a good bond, and no bubbles.
Once paper is attached, cut fabric edges, cleanly with sharp scissors. Try not to have any frayed edges, as they
might get caught going through the printer.
Load this fabric "page" into your printer as you would a piece of paper. When you have your image ready to print,
go ahead and print onto the fabric. When that is done, remove the freezer paper from the back. Now you are ready
to sew.
The rest of this project is just like patchworking/applique/crazy quilting. Place the photo fabric onto your project
and arrange any other fabrics around it. This pillow was my first project, and is very simple. I appliqued my
photo fabric onto velvet, then appliqued my velvet onto the print fabric.
Once all the sewing is done, the embelishing is started. This is great for trying out new embroidery stitches,
or use the fancy stitches on your sewing machine. Add little three dimensional charms, baubles and such. You can
make it as decorated or as plain as you would like.
When you have finished decorating your piece, you can turn it into a pillow, or frame it in a shadow box, or maybe, make
others and have a wallhanging or quilt.
One important note: Printing you fabric in this way, does not make it washable. If you plan on washing this
project, or if there is a chance of it getting wet, you should use a product called "Bubble Jet Set" on your fabric before
printing on it.
Fabric Covered 3 Ring Binder
(photo to be added soon)
Supplies:
3 ring binder
quilted fabric (I pieced together two placemats for one binder)
about 1/2 yard of coordinating fabric (could use matching napkins)
Directions:
I'm not a big tape measure person, so this may sound vague to those of you who are! But here goes.
Lay your binder, open on top of your fabric. It is best to lay your fabric wrong side up, since you will be marking
on it.
Once binder is positioned, and fabric smooth and any pattern lined up to where you would like, carefully close the binder,
lifting the fabric with the cover. With the binder closed, lightly mark on the wrong side of fabric where your stitching
line will be. It is a good idea to give yourself a slight bit of ease.
Once your marks are done all the way around, remove the binder, and cut out your fabric, leaving about 3/8" seam allowance.
You can then use this piece of fabric to aid in cutting the "inside sleeve" of the cover.
Using the coordinated fabric, cut the same size shape from the coordinating fabric. Once the coord. fabric is cut,
you can then cut it in half, down the center, top to bottom.
Depending on how thick your binder is, you may need to trim a littl extra away form the "center" edge of the coord. fabric,
before turning under on itself and finish stitch that edge. This inside sleeve can be about 1/2" shy of the fold of
the binder hinge.
Once that edge is finished, lay the sleeve fabric on top of the larger exterior cover fabric, matching up the outside
edges. Pin and stitch the tops, cover edges and bottoms. Clip your corners to help them lay flat. Turn inside
right, and press.
You will have a small raw edge at the top and bottom spine area. For this all you need to do is stitch it down
as it naturally wants to go.
And that's pretty much it. Slide your binder into its sleeves, you will have to bend it backwards to do this.
If you would like add embroidery, a ribbon tie closure, whatever you like.
Easy, Double Sided Baby Blanket
This is a great project for a begining sewer. Very simple, minimal cutting, and the style is easily changed by
the fabric selected.
Supplies:
One yard of 45" flannel
One yard of 45" calico (or any cotton type fabric)
Thread
sewing machine
Directions:
Have fun when selecting your fabrics. Mixing patterns gives a nice effect. What you will be doing is making
a double faced blanket, one fabric on one side and one on the other.
Before doing anything to the fabric - wash and dry it to pre-shrink it. If you don't do this, and the blanket is
washed after it is made, it could become bunched up, as the different fabrics will shrink at different rates.
When the fabric is dry, lay it flat on your table, right sides together (you might want to press it flat).
Do your best to line up the fabrics on at least one side. Flannel shrinks more than the calico, so your two pieces of
fabric will be different sizes after washing.
Once the fabric is layed out, give a quick measure so that you will have an "even" rectangle, and cut the fabric into
shape. Try to take off as little as possible, as you want the finished blanket to be a nice "receiving" size. Then, take
a dinner plate, or any round item, and with a pencil, trace the curve of the plate on all four corners, to round them off. Trim
the corners. Once all cutting is done, get ready to sew.
Stitch about 1/4" from the raw edge, all the way around, leaving about a 5" opening, to turn the blanket inside right.
Once you have turned the blanket so that the right sides are out, youmight want to press the blanket again, making nice, crisp
edges. Or you can just pin the edges - a lot. Now you will edge stitch all the way around, including over the
opening you left to turn the piece.
One final pressing, and you are done. You can adjust the warmth of the blanket, according to the season, by using
polar fleece for one of the fabrics, or even two calicos together for warm weather.
Crown of Thorns
Supplies:
I saw this idea on an e-mail loop and the result is beautiful. We had this on our dinner table through Lent.
A good reminder.
One purchased grapevine wreath, or you can gather your own
Box of toothpicks, or Bamboo shishkabob skewers
Brown acrylic craft paint
Paint brush
Glue (clear drying)
Mod Podge (optional)
Directions:
If using the bamboo skewers, break them to the length you would like. (I include this option as the skewers are
thicker/stronger than the toothpicks and allow you to adjust the length of each thorn.)
Paint the skewers/toothpicks with the brown paint, let dry.
Dip one end of skewer/toothpick into glue, and insert them into the wreath. Use your judgement on placement/amount
to be used.
Once the glue has dried, you can stop here, or add a coat of modpodge to the thorns.